Author Archives: Melissa Guy
Inspect Your Water Heater
Inspecting your water heater regularly is a very important, but often over-looked home maintenance step. Water heaters typically last for 8-13 years, and if your water heater is over 10 years old, inspecting it at least annually is very important.
Before You Start
- Have a bucket, hose, gloves, goggles, and protective clothing ready. Protect yourself from burns!
- Know where your Temperature/Pressure valve is located.
- Know where your cold water inlet is located.
- Know where the electric or gas shut off is located.
The Basics:
- Do a visual inspection of your water heater.
- Are there any leaks? Look under the heater where the drip collection pan is (for raised water heaters.) If your water heater is on the floor look around the bottom area. Do you notice any sediment? Any standing water?
- Look under and around the Temperature/Pressure relief valve. Any leaks? Corrosion?Obstructions?
- Check the pipes leading in and out of the water heater. Again, any leaks? Rust?Corrosion?
- For electric water heaters: Check the heating element.
- For gas water heaters: check the venting system. Is there any damage to the vent piping? Any obstructions? Make sure anything flammable or corrosive is away from the vent system to prevent fires. Also, check the pilot light. A weak flame, split flame, or a fully yellow flame means that your pilot light needs to be repaired or adjusted.
- Listen: Are there any strange noises coming from your tank? Noises such as whistling or crackling?
The Bigger Stuff:
- Turn off the electricity or gas to the heater before you start.
- Check the Anode Rod – The Anode Rod is your water heater’s defense against rust and corrosion. If you have hard water, checking them more often may be in order. The condition of the anode rod can tell you if your tank has corrosion occurring inside.
- Drain and flush Tank. Sediment can collect in the bottom of the tank, which can shorten the life of your water heater.Draining Your Water Heater: How-To Did you know that draining your water heater occasionally can extend its life? It’s an often overlooked home maintenance step, but one that can save you costly repairs. Draining Your Water Heater Over time, sediment collects in the bottom of your water heater. Here are the steps to drain it and help keep it in perfect working order for as long as possible: Turn off the power or gas to the appliance. Turn off the cold water supply (that feeds the water to the tank.) Attach a hose to the drain valve near the bottom of the tank. Turn the valve to open it, and direct the water into a drain. Plan ahead for this step by making sure that you have a way to drain the water. Turn the water back on for a minute or two to flush out any sediment remaining in the tank. Close the drain valve, open the cold water supply to fill the water heater back up. Relight the pilot light or flip the power back on. This is a perfect weekend project that won’t take very long, but has the potential to save you money and headaches in the future.
- Inspect the Temperature/Relief Valve If the T/P valve ever discharges boiling water or steam, shut off your water heater immediately and give us a call. This is a safety problem.- Be sure the electricity/gas is shut off.- Shut off the cold water inlet
– Position the bucket to catch run off
– Pull the trip lever on the valve. You should hear a slight hissing noise of air escaping or see some water vapor exit. If this does not happen, the valve likely needs replacing.
Relight a Piolot Light on Your Hot Water Tank
Going into the colder season, our water heaters are often utilized to their maximum output. And during the cold season, the wind that picks up can really wreak havoc on gas water heater pilot lights.
Once your pilot light goes out, it is usually a simple task to get it re-lit again. The following is a detailed image of a gas water heater complete with names for all the major parts.
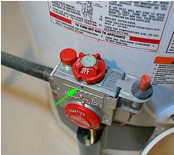
The gas valve pictured below is where you will start when your water heater pilot light goes out. The first thing you want to do is to turn the water heater’s gas supply off – note, the green arrow pointing to the word off.
Next, turn the temperature dial above, on the face of the valve, to the “Vacation setting”. You are now ready to access the burner area below.
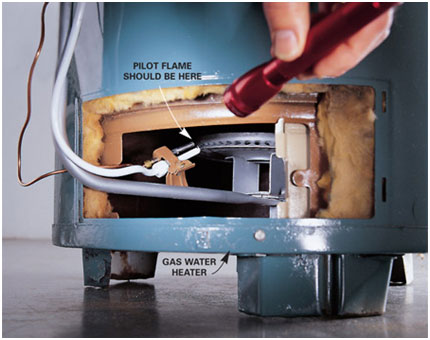
As you can see, the pilot light is accessed through the small opening located towards the bottom of the tank.
 Note, the therm-couple above is equipped with an igniter. This current model will also have a sealed burner area which we’ll touch on soon. But other than that, the pilot light on both models is exactly the same.
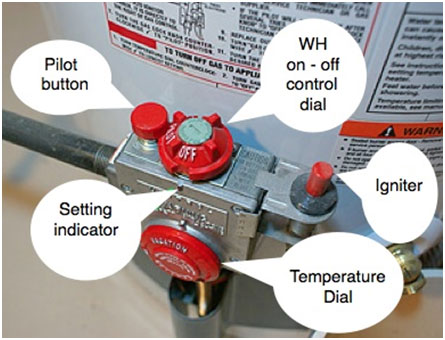
 On both types, the first step is to move the dial on the gas valve from off to the pilot setting. You will notice that in this position, the half-moon cutaway on the on-off control dial is now aligned with the pilot button. This button is to be pressed down and held during the entire relight process. You will know that the control dial isn’t completely in the correct pilot position if the pilot button will not go down.
Pressing this button down, allows the gas to flow out through the pilot opening. Once the pilot is re-lit, you must keep the pilot button down for at least 60 seconds to allow the thermo-couple to heat up. Heating up the thermo-couple creates a small electrical charge that will activate and keep the magnetic valve open. If you release the pilot button too soon, then the pilot will go out and you will have to begin the process over.
To re-light the pilot on an older open burner system, you will hold a long match or lighter, under the pilot opening while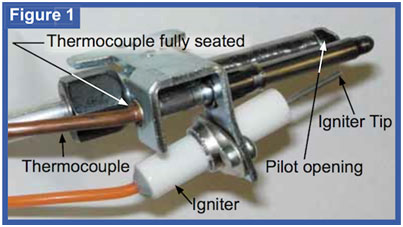 holding the pilot button down. Once lit, again – don’t release the pilot button. You must keep it down for at least 60 seconds after it is re-lit.
For a sealed burner, proceed exactly as above except, to light the pilot, you simply press the igniter button pictured above. Note: with a sealed system, you won’t have easy access to the burner area and won’t use a match – the igniter button will do the lighting. On sealed burners you almost need to stand on your head in order to see the pilot light’s position in the dark. In fact, many times a pilot may have actually lit but just cannot be seen.
 After the 60 second wait, slowly release the pilot button. If the pilot is still lit, then slowly turn the temperature dial up to your desired temperature. Don’t let the sudden “WHOOSH”, scare you. This is what you want to hear as it is merely the water heater firing up again.
When the pilot light won’t remain lit, the problem is usually more than just a blown out pilot light and will need a professional.
Freezing Water Pipes & Disaster
The mercury has certainly dropped around the Portland Metro area lately. Frozen pipes are always a risk when temperatures skid to the freezing-and-below mark. Here are a few tips on how to keep your pipes from freezing, and what to do if disaster strikes:
- Let your faucets drip overnight, particularly un-insulated pipes located on an exterior wall. Lukewarm water is your best bet.
- Keep cabinet doors to those areas open to allow the heat from your house to circulate around pipes near exterior walls.
- Keep your thermostat set to the same temperature both day and night. Experts recommend setting it no lower than 68 degrees.
- Know where your main valve and water heater valves are, just in case.
Monitoring your pipes:
- The first sign of freezing is reduced water flow from a faucet. Check the flow before you go to bed and when you wake up.
- Check your pipes around unheated areas, exterior walls, and crawl spaces. They tend to be the most vulnerable.
- Check for drafts and caulk areas near pipes where you feel cold air coming in.
If your pipe freezes:
- Inside, a hair dryer can do a great job of warming up the pipe. Just make sure you’re not standing in water!
- Heat water on your stove and soak towels in the hot water, then wrap your frozen pipe in the towels. Start with the portion of the pipe nearest the faucet.
If your pipe bursts:
- Turn off your water at the main valve.
Fall Plumbing, Heating, and Cooling Maintenance
The cold weather will be here before you know it. If not already done, now is the time to make sure your house and its’ heating system are ready for winter. Here is a brief checklist to guide you through some basic tasks before it is too late:
PLUMBING
- Drain exterior water lines and open taps (in cold areas).More details on this in October’s News Letter.
- Insulate water lines that are subject to freezing.
- Check the condition of the water heater.
- Check plumbing system and fixtures for any evidence of water leaks.
- Confirm proper operation of your sump pump, if present.
- Check your drainage that receives water from the downspouts. If clogged, Rooter n Drains can clean them with high pressure water.
GROUNDS
- Check window wells, dry wells and storm drains for debris or blockage.
- Repair any driveway cracks and/or heaved or settled walkways.
- Trim all trees and shrubs that are too close to house.
- Check (ideally during a rainstorm) for rainwater drainage away from foundation.
- Clean and put away summer furnishings.
EXTERIOR SURFACES
- Check weather tightness of all exterior surfaces and components.
- Check for deterioration of painted or finished areas. If too late for a full paint job, prime and touch-up bare wood surfaces.
- Caulk and seal all joints in siding, around windows and doors.
- Check and seal any foundation cracks.
- Improve weather stripping at exterior doors and windows as needed.
- Reset storms and screens where required.
- Look for any signs of insect or pest activity around the foundation and wood components close to the ground.
ROOF
- Check for loose, damaged or missing roofing.
- Check soffit for signs of moisture build-up or damage.
- Check condition of chimney.
- Check flashings for signs of lifting or damage and repair as needed.
- Check and clean all gutters (eaves troughs) and downspouts.
ATTIC
- Check ventilation openings for nests, or other blockage.
- Check position and condition of insulation for uniform coverage.
- Look for any signs of excessive moisture or heat buildup.
- INTERIOR ROOMS
- Check all areas for signs of roof or plumbing leakage.
- Have fireplace or wood stove and flue checked and professionally cleaned.
- Reset any automatic timers for change in daylight hours.
- Check all smoke/carbon monoxide detectors. Replace batteries if over a year old.
- Test Ground-Fault Circuit-Interrupters using built-in test button. For help with this, contact Metro’s Best Electric.
HEATING/COOLING SYSTEMS
- Clean all elements of the cooling system(s).
- Remove (or winterize) room air conditioners.
- Follow manufacturer instructions for the maintenance of your heating system(s).
- Test and start humidifier, if present.
- Change or clean heating system filters on warm air systems (now and regularly).
- Check for any heating and cooling systems for any evidence of water leaks.
- Have your heating system serviced annually by a qualified heating service person before each heating season to keep it functioning efficiently and properly.
Drinking Water Through These Pipes?
Galvanized pipes are usually found in homes over 40 years of age. Commonly, these pipes will rust from the inside out. The pipes will corrode over time and this rust accumulates, restricting the flow.
Sometimes, if the water is not in use for long periods of time and then turned on, you will see that the water is brownish in color or that fixtures have become rust-stained. Doesn’t it make sense to have your systems upgraded on YOUR schedule, before they rupture and cause damage.
Q: Won’t this kind of extensive work cost a fortune?
A: Although cost is really subjective to each individual, the cost to upgrade your home’s plumbing system is an investment that will have benefits for many years to come. Water that’s safer to drink, more water pressure, less faucet and fixture maintenance and, in the worst case, averts the possibility of catastrophic failure.